Make Library Request is the right-click option, or menu option, used to reserve one or more physical objects for yourself or on the behalf of someone else.
Members of the following roles can make library requests:
Physical Records Manager
Library Administrator
Library User
All physical objects selected for a library request must have at least READ permissions.
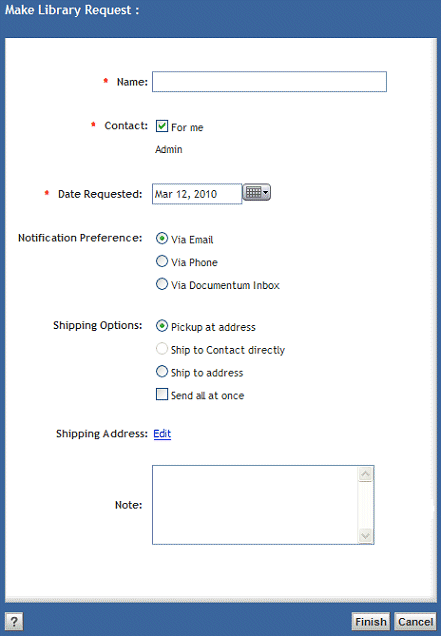
The value for the Name must be unique and is used to identify the library request.
The mandatory Contact information, is used to track who is requesting the item.
The value for the Date Requested is automatically set by default to 30 days from the day the library request is made. The default setting for the Date Requested can be changed as needed.
The Notification Preference you select indicates the means by which to communicate with the Physical Records Manager who can honor your request.
The shipping option can be selected so that the physical objects are shipped to the contact directly. Ship to Contact directly however, is disabled if the contact specified is not associated to an address.
The Shipping Address is mandatory. The value for the Shipping Address is automatically populated if the shipping option is set to Ship to Contact directly and an address is associated with the contact specified. Though the Shipping Address is automatically populated, if the contact specified is associated to an address, it can be edited to specify a new or different address by selecting Ship to address instead of Ship to Contact directly.
Regardless of the radio button selected for the shipping option, the checkbox for Send all at once can also be selected if all items requested need to be sent together.
Options in the following screen shot show default settings. The next screen shot shows the default settings when the contact for the logged in user is not associated to an address. Ship to Contact directly is disabled. The Shipping Address is displayed only if you change the default setting for the Shipping Options to either Ship to Contact directly or Ship to address. The Shipping Address is automatically populated if Ship to Contact directly is selected. The Shipping Address must otherwise be specified manually if Ship to address is selected. You can see the Shipping Address revealed in the screen shot that follows this one.
This next sample screen shot changes the request such that it is being made for someone else, as the For me checkbox is deselected leaving it up to you to specify a contact, whether from an existing list or by adding a new contact. The New contact button is only displayed if the user is a Retention Manager. Only retention managers can create new contacts on the fly. If you click the button, a new contact can be created.
Note
The contact is not removed if the library request is canceled.
Figure 11.13. Screen displayed when making the request for someone else if the user is a retention manager
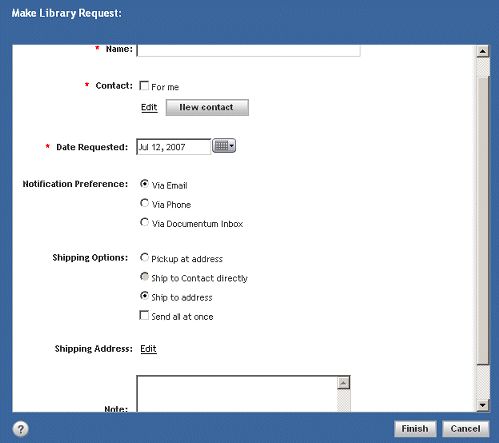
The interface assumes the reservation is being made for yourself when only one contact is associated to you. You can tell that the reservation is for you when you see the For me checkbox displayed. The value for the Contact is automatically populated and displayed along with a For me checkbox, selected by default, for the logged in user only if the logged in user is already associated to exactly one contact. The name or value for the Contact and the For me checkbox are otherwise not displayed, as the system will not know which contact to display if you are associated to none or more than one contact.
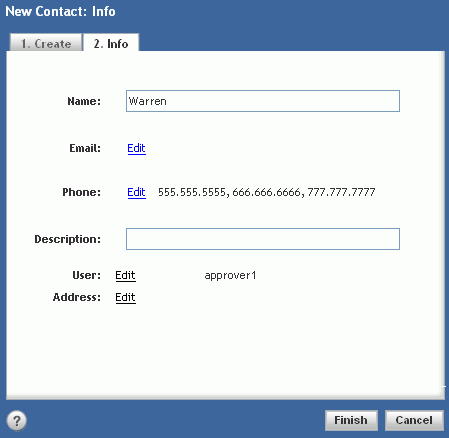
Deselect the For Me checkbox if you are making the library request for someone else. Then, click Edit to specify the contact from an existing list of contacts or add the new contact name using the New contact button (which is made available only if you are in the RPS Retention Manager role). The New contact button, when displayed, facilitates specifying a new contact saving you the extra steps of leaving this procedure to create a new contact. As well, the contact information will automatically be filled in when you return from making the contact.
Note
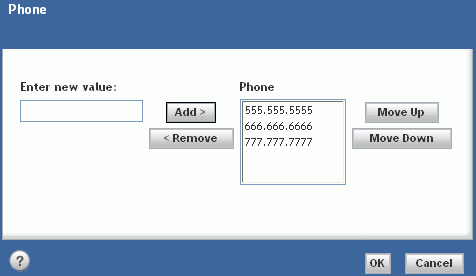
The phone number provided for the Contact, if the Via Phone option is selected for the Notification Preferences, is by default taken from the top of the list if the contact specified has more than one number listed. The string of fives in the example illustrated below would be the phone number used.
The Phone numbers listed for the Contact can be rearranged as necessary when you select Edit. Email listings are edited similarly. Each new number added however gets added to the bottom of the list, as illustrated below, so if you want the new number to be used by default, make sure to move it to the top of the list before you click OK. For example, if you want 777.777.7777 to be the default number for the contact, move it to the top of the list and then click OK.
If you are making a request on behalf of another user, you need to select the contact from a list. The requestor is defined to be the person who will be getting the item and is associated to an RPS contact. As well, the contact must have an email address or be associated with a Documentum user.
The same physical object(s) can be requested by multiple library requests; the physical object(s) you have requested can also be requested by others. Library requests are fulfilled at the discretion of the administrator, not necessarily on a first come first served basis.
To make a library request (reservation):
Navigate to a physical object that you would like to reserve: typically a box, physical folder, or physical document.
Contents in a container such as a box or physical folder are identified on the manifest for a library request once the library request is created. Creating a library request for a box, for example, will include any physical folder(s) and/or physical document(s) on the manifest if those physical objects are in the selected box. The manifest only identifies the container if no other physical objects are included in it.
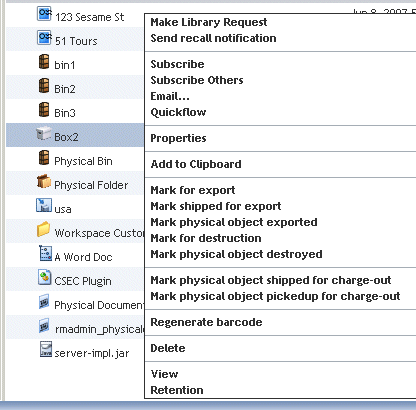
Right-click the physical object and select Make Library Request.
You can select multiple physical objects, two boxes for example could be included in a single library request, by selecting the two boxes and then right-clicking one of them to select Make Library Request.
The Make Library Request screen is displayed.
Enter values on the Make Library Request screen for the three mandatory attributes, and if needed for the optional attributes, according to the following table:
Table 11.7. Attributes on the Make Library Request screen
Attribute Description *Name Type a unique name so it can be identified when listed with other library requests. *Contact Use this attribute to make a library request for yourself or to make it for someone else.
Deselect the For me option when making the request for someone else.
Click Edit if you need to add or change a contact.
Click the New contact button, revealed to Retention Managers only, if you cannot find the needed contact from the existing list using Edit.
*Date Requested The default value for this mandatory attribute is set to 30 days from the current date. Pickup or shipment of requested items is expected 30 days from the day the request was made. You can change the default setting as needed. You can change the default setting from dmc_prm_docbase_config as needed. Notification Preference Select the preferred means of communicating.
Make sure that if you use the DCTM Inbox option that the contact is associated with a DCTM user.Shipping Options Regardless of the radio button selected for the shipping option, you can also select the checkbox to send all requested items at the same time, limiting the request to only one charge-out. The default option is set to Pickup. The Shipping Address is automatically populated if the shipping option selected is Ship to Contact directly. You need to specify the Shipping Address if the shipping option is Ship to address.
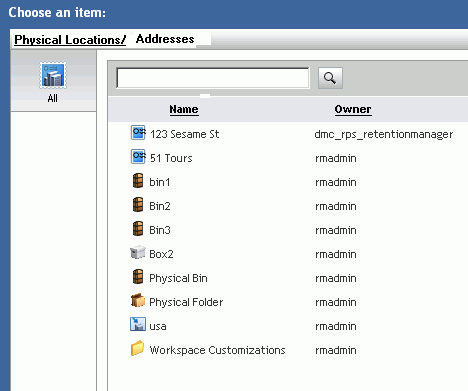
*Shipping Address The address locator or chooser is displayed when you click Edit. Note Any additional instructions needed can be expressed. The Choose an item screen is displayed when you click Edit for the Shipping Address. Only address objects, if other objects are listed as well, are valid choices.
Click Finish on the Make Library Request screen to accept the values entered.
The new library request is now displayed in the content pane under Library Requests. The value for the Current State is Submitted and remains so until the library request is converted to a charge-out.
